Using the Bodies - Thicken (Solidify) option
Time to read: ~3 min
The Thicken option, defined by the parameters in the Options on the left-hand side of the main display, is primarily focused on generating
a solid body from an original body that does not define a closed volume.
 Thicken
As mentioned on the Bodies - Tab page, the Thicken tool is somewhat unique within InStep in that it can generate
new data from existing surfaces by offsetting and connecting faces based on a few simple rules.
The image below shows a typical case where the thicken option is applicable:
 Shell Body
This body is the result of a local 3D scan of a special shape. Though it could be exported to a STEP file and used in the target application as a
sheet body, that is not always the case with applications that require solid body data.
For this shape, the most appropriate option is to thicken the body by using the default options provided in the Options panel (under its Thicken Tab):
- Method
-
The Method drop-down options include
Local means that at each vertex/point, the normal resulting from the normalized average of its surrounding faces is taken and then multiplied
by the Factor provided below. This is generally considered the default (and best) option as it accounts for local warping in the surface. It generates
a smaller offset where there are many surfaces that are strongly bent and thus avoids expanding the surface to intersect others nearby.
Uniform approaches the offset similar but, at each location, computes the unit length of the averaged normal and then multiplies this by the
provided factor to effectively get a original-to-new location distance that is the same everywhere.
To Plane offers a different approach in that all newly generated points are projected onto a plane (surface). In general, this will not lead to
a useful shape except for cases where the surface is more or less flat or at the least does not have regions that fold over the projection direction.
this can be useful for cases where the ultimate use is to generate a solid block for machining or similar processes where the back side is simply
considered material stock. It further also helps is reducing the size as all projected faces can be combined into a single, planar polygon.
- Parameters
- Depending on the 'Method' selected, the option will provide the local Factor (the multiplier), the uniform Distance or the definition of the plane
to project to (given either as a point and normal direction, three points or a coordinate plane such as the X-Y plane)
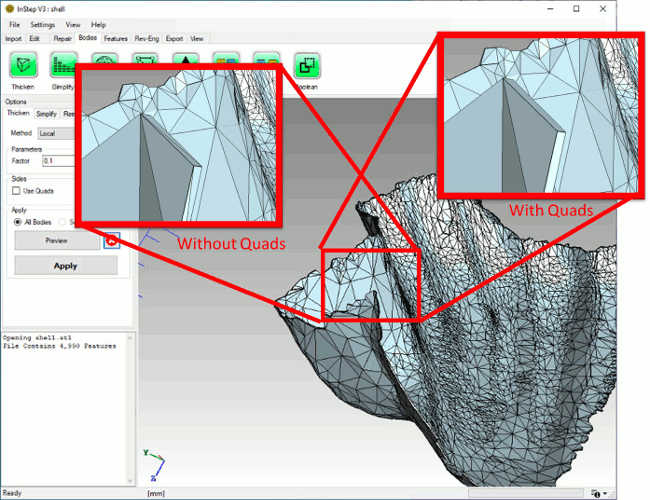
- Use Quads
- This option allows the sides (where the edges are defining the boundary of the shell surface) to be generated as single Quadrilateral
shapes rather than two triangles. This can reduce the size of the final STEP file but may introduce additional issues when other tasks
are performed that require triangles.
 Shell Body thickened into a Solid
The result for the default parameters shows that the new surfaces very closely match the original data with a thin offset applied and boundaries closed.